CD Printing, how to get the best out of your disc design.
When the CD was launched in 1982 it was a technical marvel in many ways. However one aspect of CD manufacturing still seemed a little antiquated, the actual printing on the CD. Early CD pressing plants only offered black print on the silver surface of the CD. As time went by some CD manufacturers offered other colours of ink for the disc printing, and then adding the option to print separate colours!
Up until the late 80’s most CD factories could only print a maximum of 3 separate colours on the disc. But even this major step forward was not enough to satisfy the demands of designers who dreamt of printing the disc full colour. Eventually CD pressing plants caved in to this demand and began offering full colour CD printing, or picture discs, but this came at with a hefty price increase. Happily those days are pretty much behind us, and nowadays most CD manufacturing plants offer high quality full colour print as standard, or for a minimal surcharge (we actually offer full colour print in all of our CD manufacturing prices).
 Today most factories offer two methods of CD printing, off-set litho and silkscreen printing. This article will cover the difference between the two methods, which one will suit your design best, and some special techniques to help you create a eye catching design that stand out from the crowd.
CD Printing Silkscreen
Silkscreen the traditional method of CD printing, however I believe this type of CD print offers creative options that if used correctly can give some great results. Most CD pressing plants offer this type of print with the option of using up to 5 “spot” colours. The colours are generally picked from the Pantone Solid Coated Colour library of about 1300 individual colours. This colour palette is available in all professional design software, however I strongly recommend NOT using Photoshop for dealing with Pantone colours.

CD Printing Solid Colours
Because we use pre mixed colour inks, CD printing using Silkscreen excels in printing solid colours. If your design is made up of blocks of solid colour, then this is by far the best method of disc printing. However halftones or “tints” where you have say a 30% density of the solid colour does not work so well. With lower ink density you tend to be able to see the actual “dots” that make up the screen and to be honest it can look a bit messy. One way around this is to have the lighter colour as a 100% solid, and then over-print a secondary colour in the areas you want to appear darker.
Silkscreen CD printing inks tend to have a slight gloss sheen, but you can also use a matt varnish on the ink, so you can have sections of the artwork with a gloss finish, and other sections with a matt finish. This is very effective in highlighting individual elements of the design or for adding subtle text effects. Many of our Metal clients like using a matt gloss black ink with a spot matt varnish for the text.
One thing to be aware of when using a particular colour theme throughout your design for the packaging and the disc is that it is not always possible to get a close match to colour that has been mixed in CMYK and a Pantone colour. In these cases it might be advisable to print the CD using the off-set style of print to get as close of colour match as possible throughout the CD packaging.
It is possible to print full colour (CMYK) using silkscreen, but we would always recommend using offset litho, as the halftone reproduction of offest CD printing is far superior.
Below are some examples of the type of designs suited to Silkscreen CD printing.

CD Printing Offset Litho
The new kid on the CD printing block, the type of full colour disc print designers from the 80’s could only have dreamt of. In many ways this type of print is very similar to that used to print on paper and card, and uses the same 4 primary inks, Cyan, Magenta, Yellow and Black, to create the full colour CD print. It gives exceptional results when printing full colour photographic types of images. However when printing large blocks of solid colour it does not give the same type of ink density compared to silkscreen printing, and the results can look a little “washy” depending on the mix of colours.
To use this type of print, the disc has to have solid white base printed first. If your design uses elements of the silver of the disc to show through, you will have to create a separate custom white base plate that has the sections of silver “knocked out”, more on this later. It is also worth noting that the inks used have a very matt look to them compared to the silkscreen inks and special varnishes are not available.
CD Printing offset – Rich Black
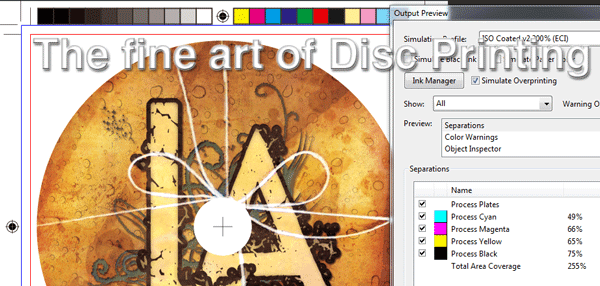
When printing large areas of black, it is recommended that you use a “rich black”, this means adding several colours together to make a deep black, I recommend using 40% Cyan, 40% Magenta and 100% black. Otherwise if you print 100% black with no others colours supporting it, the black tends to look a bit grey. The maximum amount of ink density / coverage is 300%, this means that your combination Cyan, Magenta Yellow and Black must not exceed this amount. So don’t set up a colour with 100% Cyan, 100% Magenta, 100% Yellow and 100% Black, as this will result in the CD print department rejecting your artwork.
Below are some examples of CD’s that are best printed using the offset litho method.

Understanding the disc structure for CD printing.
Most people think a CD is silver all the way from the outside to hole in the centre, but this is not the case. The disc has 3 main areas where the surface of the disc changes. Understanding these areas is only really important if you are not printing a solid white base on the disc, as this white base covers the different areas and will not generally affect the design. If you are not printing a solid white base and you have sections of the design that crosses the areas below you should note that the depth of the colours and the surrounding background will change. The areas are as follows:-
CD Playing area.
This is the section that runs from the outside of the disc into a diameter of 46mm, this is normally a slightly dull silver that covers the majority of the disc.
Mirror Band
This area is from 46mm to 35mm diameter, and is a highly polished and more reflective section. It also contains some text etched into the stamper and sometimes a barcode for stamper identification.
Clear disc area
The section inside the Mirror Band from 35mm the the centre hole is clear plastic.
Below is a scan showing a pressed CD that has been printed without a white base and text running from the playing area into the mirror band.

Custom White Bases for CD Print
Some designers like to incorporate the silver surface of the CD into designs that also have sections of white coming through. To achieve this we have to print the CD with what we call a “custom white base”. A standard white base will cover the entire disc with white on which the other colours are printed. To allow sections of silver to come through, the custom white base must have these areas left clear, so a separate piece of artwork needs to be made to allow this to happen.
I can not stress enough the importance of making sure that the corresponding areas on the white base and the area with inks on the disc match up exactly. If the dimensions of the images or text on the white base differ to that of the colour plates, you will end up with either white “halos” around the text or images, or some areas will not have white support and the top colours will change where the white base runs short.
Below are a couple of examples of how this should be set-up. On the first example below the client wanted to have copyright text, track numbers and the text & logos at the bottom of the CD to print white and the text “Seven” coming through as the silver of the disc. You can see the artwork for the custom white base that was created on the right, you will notice that the base is solid with the exception of the text saying “Seven” that will come through as silver. This CD was printed using the silkscreen process.

The next example is a little more complex. The client wanted the majority of the disc to be the silver of the CD but with the text and horse images printed in colour. The white base made for printing this CD has the image of the horses and the larger text set as a solid that was used to print the white base, as you can see in the image on the right.
However you will notice that the smaller text does not appear on the white base. This is because the text is very small, and there is a concern that if the registration is slightly off, you will end up with blurred text. However as the text is printing black we do not have to worry about the colour darkening or changing, so it was decided to not print a white base for the black text.

Get creative with your CD Printing
Hopefully the process of CD printing is a little clearer now, it is not always as straight forward as drawing pretty pictures. It can be confusing, and it is not always obvious which type of CD printing you should use. Some designs contain large blocks of colour with other elements that have graduations and fades. In these instances I would recommend you speak to your CD manufacturing company and send a rough mock-up of what your are planning to do, and take their advice.
But lets not forget, no matter which method of CD printing you choose, you will not be able to make a bad design look good, but you can make a good design look great…..
Cheers
Kev Pure