Design tips for CD inlay printing

This little piece of paper is the most misunderstood template in CD printing. To be honest even CD printers call it by different names, the two most popular being “CD Inlay” and “tray card”. It wouldn’t surprise me if you are thinking “what is a CD inlay?”, and you would be surprised to know that is one of the names given the the the piece of paper that goes in the back of a CD case, you know the one, it normally has the track listing, a barcode, the text you can read on the sides when the CD case is in the rack? OK here is a picture to help jog your memory…

Even though the album case is still the most popular format of CD packaging, and we are so familiar with it, many people struggle to get the artwork for the CD inlay printing set-up correctly, but don’t worry read on and we will put that straight.
 Different types of CD Cases
Most CD pressing plants offer two types of CD cases. These days most people opt for the type of CD album case that is fully transparent/clear, this will allow you to print on both sides of the inlay. If you decide to have the type of case with black clip trays, you will only need artwork for the rear inlay. If you are producing a double CD that is going in a black tray, you will still need artwork for the inside inlay.
CD Inlay Rear / Outside
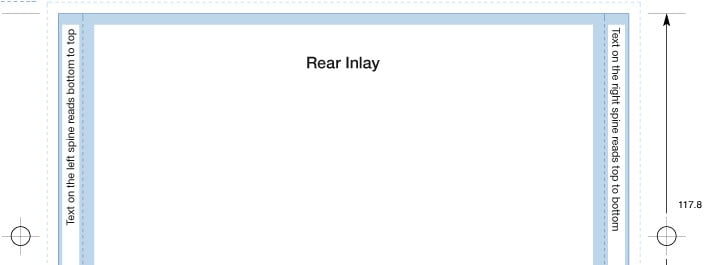
Most people assume that the area on the back of the CD case where we normally have the track listing and barcode on is square like the CD booklet pages (121 x 120mm). It is actually a different aspect ratio, being much wider and slightly shorter @ 138 width x 118mm height, this does not include the spine area. As the aspect / size is different, if you are using the same image for the booklet and inlay, the inlay version will have to be cropped slightly differently or have the aspect ratio changed, if it is a photo of the artist or band, I don’t recommend altering the aspect by stretching the width, it will make them look like they have put on some weight!
CD Inlay information
The sort of information that is normally included on the CD Inlay is, the tack listing, the barcode, record label and distributor information & logos, contact details (email, website, facebook or twitter), copyright text and the catalogue number. A fairly recent trend for albums with a large number of tracks, is to have the information rotated by 90 degrees, by doing this is you are utilising the extra width. It does help with fitting on large track lists, but otherwise I would tend to stick with the traditional top to bottom text arrangement.
We are often asked where it is best to put the CD barcode on the CD inlay, and to be honest it doesn’t really matter from the point of view of CD manufacturers, distributors or retailers. The size of the barcode is another consideration, there is no industry wide standard for barcode size, but we recommend approximately 15 x 30mm as a good safe option. If your barcode is at the edge of the page, your barcode artwork will need enough room for “bleed“.
The Outside CD Inlay Spines
Our final tip for the rear inlay artwork is the one that causes most confusion. Along both sides of the CD rear inlay we have an area called the spine. This is the artwork that runs up the side of the album case where you normally have the name of the artist, the album tittle and the catalogue number.
In order to be read the right way up when in a rack or storage system that has the discs stored horizontally the spine on the left of the inlay should read from bottom to the top, and the text on the right hand spine should read from top to bottom.
The spine width is 6.5mm and from a visual point of view and in order to allow for any movement during trimming I would not recommend having the text the full width of the spine. It is best practice to allow about 1 – 1.5mm from the edge of the spines.
Inside CD Inlay
If you have a CD album case that has a clear tray / fully transparent you will need to have artwork for the inside of the inlay. Only two main points to consider for this artwork, but they are big ones. Firstly you will need to remember that as the CD case is fully transparent the artwork on the left of the inside inlay will be visible from the front of the case when closed.
CD Inlay Clear Spine Area
The section that is visible is from through the front of the case is about 9mm wide form the inside left hand spine. If the difference between the artwork of the booklet and the inside inlay is vastly different you may want to consider printing this area as a solid block of colour to match the front page of the booklet and the inlay. I would actually recommend that the section that should be be about 13mm, just to be on the safe side.
If you are designing the inside of the inlay with text in this area to be seen from the front of the case, a maximum width of 9mm is a good safe bet to make sure that the text is not obscured by the front of the case.
CD Disc Holder Area
Another common misconception about the inside of the inlay is that the hub and disc holder section that the CD sits on is in the centre of the artwork, it is actually offset slightly to the right, so if you place an image that you want to appear directly under the disc in the middle of the inlay it will actually not be central to the disc.
The disc holder section is 120mm in diameter, so if you don’t want the image that sits underneath the disc to be visible it should be within this diameter. The actual centre of the disc holder is 80 mm from the left of the inlay and 59 mm from the bottom, these measurements are from the the edge of the page and exclude bleed. It is also worth noting that when the disc is in place any artwork under the central hole of the disc disc will be seen.
Making a Dummy of your CD Printing templates
So that about wraps it up for specification for the inlay, but I have one last practical point. Once you have finished your design I would strongly recommend printing the artwork on to a sheet of paper, then using the crop marks cut the booklet & inlay to size and putting this in a CD case.
We call this making a dummy and you can often pick out design elements that don’t work particularly well by doing this, saving the heart ache of getting your order back from your CD printing company only to find out that the design does not work in print as you thought it did on screen.
Go forth and create a great CD Inlay Design
I hope this article makes things a little clearer, to be honest it is one element of designing great CD artwork that even some of the the best designers struggle with. The fact the CD inlay is an integral part of the case, what you see on screen does not always translate to print as you might expect. But if you take the above tips into consideration, you should be almost there with your CD inlay printing.
Cheers
Kev


A great article, thanks.
I have a question: what software would I be wise to invest in in order to use the templates that you provide?
My graphic design experience revolved around scalpels, wax rollers, and drawing boards!
Thanks,
Dave.